
In this post, I want to set up a project with you. I will provide some config files and also offer some insight into why we make those configurations. Furthermore, I will give explanations of why I chose this toolset for the project.
Introduction
There are many articles out there explaining some combination of the tools mentioned in the title. I recently scrolled through the source code of old projects of mine and came across a C++-project I hadn’t looked at in a while. It was set up in classic bare C++-project fashion:
- A Readme that was pretty old
- Some .h and .cpp files
- A CmakeLists file that only had the code required to make the Boost integration work and polluted the main folder
- Old build artifacts scattered everywhere
In a recent post on Medium.com I have talked about the idea of putting every single project you have ever worked on into your Github account as a backup so I considered doing that first. But then I felt a little ashamed because I realized in what a terrible shape the project was. Even though the project was supposed to be private on Github, I wanted to keep a version history of a somewhat sane state so I had to clean it up first. There were multiple obvious problems with the project and I started to tackle them one by one to transform the project into something of an acceptable state.
If you have any problems running the command line instructions listed in this article, try and install the packages they belong to, by calling
apt-get update
apt-get install git cmake build-essential tar curl g++ gcc-9 clang-10
I run Ubuntu 20.04 on my systems. If, for example, gcc-9 is not available for you, use an older version, or simply go with the version provided as default (replacing gcc-9 by gcc). If you use a compiler-version lower than 9, keep in mind though that Cxx20 will not be available to you and you should replace C++20 mentions with C++14 or C++17, in your CMakeLists.txt.
CMake
Most C++ projects start with a good CmakeLists file. Since C++ is a platform-independent language, every platform has to come up with build-tools (aka. compilers, linkers, etc.). This made it necessary to come up with ways to simplify this process if the language was going to have a future and that’s where make came in. make is a build automation tool that basically calls commands and sets parameters for them. Some people still write the config-files for make (aka. Makefiles) themselves but most devs have moved on to cmake which in turn automates the configuration of makefiles. The best feature of Cmake is, that it can detect libraries and compilers on your system and automatically configure them for you.
In my project, for example, I want to incorporate the Boost library, which is one of the largest C++ libraries out there. Cmake offers the possibility of detecting if it is installed and automating the process of telling the compiler where it is. Another nice property is, that Cmake only uses a single configuration file (or cascading files if you want to configure sub-projects on their own). Because it is so compact and the absolute standard in the C++-world, IDE integration is great, too.
As a first step I cleaned up the folder structure in the project creating the following folders:
- src: This folder will contain the .h and .cpp files that contain the functionality of the project. Further structure could be introduced here but I don’t want to overdo it here. Many projects will only consist of 10 files or less and then one folder should suffice. If you choose to further subdivide this, the following steps will be exactly the same.
- main: In this folder I put the entry-point of the project for stand-alone execution. Based on this file the main binary will be built.
- tests: This folder will contain c++ files with unit-tests. Adding gtest will happen later but I created this folder right away.
- third_party: This folder will contain external dependencies. In my case this will only be googletest. If Boost was smaller, it could also be put here but since it is ectremely large and should not be built as part of my project, I decided to install it on operating system level.
Now that we have these 4 folders, we can begin populating them. Main should contain a main.cpp with the code for the main binary. src should contain some headers (.h) and source files (.cpp) that contain the actual functionality. tests can remain empty for now and we will populate third_party later. For now, we don’t need googletest and we don’t use Boost so we can start configuring the build with cmake. The CMakeLists.txt I would propose looks as follows:
cmake_minimum_required(VERSION 3.0)
project(MyProject)
set(CMAKE_EXPORT_COMPILE_COMMANDS ON)
set(CMAKE_CXX_STANDARD 20)
set(CMAKE_CXX_FLAGS "${CMAKE_CXX_FLAGS} -fopenmp -o3")
add_library(Core src/file1.cpp src/file2.cpp)
add_executable(Main main/main.cpp)
target_link_libraries(Main Core)
Lines one and two are cmake basics. I recommend you use cmake 3 since it is available for every platform and project simply names your project. Next we execute set(VARIABLE VALUE) 5 times to specify details about the build. The first one is the most specific one: CMAKE_EXPORT_COMPILE_COMMANDS causes cmake to produce a file called compile_commands.json. This line is only required if you use Clang as a compiler or as a utility in your IDE. Personally, I use clang for better code introspection in VSCode and if you have no reason not to, I recommend you do the same. It is a bit slow at times, but I think it is worth the wait.
CMAKE_CXX_STANDARD is set to 20 in the next line, specifying that I want to use C++ in the 2020 version. My code makes use of std::set which received a useful contains() method in C++20 and I all around just want to be on the latest version if possible. This is not really required, but if you have a gcc 9 or clang 10 on your system (run gcc –version to find out) why not use the best C++ available?
Next, I added two C++ flags for the compiler, namely fopenmp and o3. The first makes OpenMP available, the other causes the compiler to run some basic optimization on the code. Introducing OpenMP here is impossible, there is simply too much to say, however, I can help you decide if it’s worth looking into: If you have ever had a long-running loop performing some task and taking forever even though the individual runs of the loop were independent and you wanted to make it run in parallel because your computer has more then one core, then you should look into OpenMP. You can simply add #pragma omp parallel for in front of a for loop and it will make it run in parallel with as many processes as your system supports. These two commands only influence performance of the code and can be removed if you don’t need that.
The last three lines are the ones where CMake does some actual work: Add_library(Libname Libfiles…) declares a library. A library is a module you can use in other code that contains a certain functionality. We compile all files in the src directory, so all our functionality into one library called Core. After the name of the library you simply write the paths of your .cpp files and of any single .h files. My pattern is always to include the headers from the source files. So a.cpp has an include “a.h” in it. Additionally I usually have files constants.h and types.h which contain type declarations and constant values. Since these don’t have a corresponding .cpp file, I add them here aswell.
The library itself only declares some functionality but it doesn’t execute it, so we need an executable. Fot this purpose, we have our main.cpp which contains a static void main() method, declaring the entry point of our application. To have cmake build an executable from it, we declare it with add_executable(BinaryName main/main.cpp). This declared, that a binary should be compiled containing the code from main.cpp.
The binary will not work on its own most likely. It will have some include “../src/someHeader.h” referencing code from the src directory and therefore we will have to provide that functionality, which is now contained in the Core-library, to it. To do so, we link them together in the last command, which means that the so-called linker will tell the executable where to find the functionality it included from external source files. This functionality is contained in the Core-library so we pass it to the linker.
As a last remark on this topic, I recommend “out-of-source” builds. This means that you put all your Makefiles, binaries, and libs in a separate folder. This can be achieved by running cmake in a different folder than the one containing you CMakeLists.txt. As mentioned before, Cmake only writes Makefiles, so after running cmake, we still have to call make to perform the actual actions we have configured. Navigate a command prompt to the root folder of your project and simply call
mkdir build
cd build
cmake ..
make
First, we create a build-directory by calling mkdir. Then we enter it and run cmake. The two dots after cmake means “run cmake in the parent directory.” and make will start compiling everything. After these commands, you will find some CMake-junk and all other build files in your the build folder that you can (.git)ignore.
So now, we have a build configured and, if you only change some content of the source files, you only have to call make to recompile them. A nice property of these generated Makefiles, is, that they contain all information about steps that can be performed in parallel. You can, therefore, call make -j4 to perform 4 processes in parallel, which should speed up the process quite a bit. You can also use more or fewer processes, depending on what your computer can handle. Never use more than the number of cores you have available though.
GIT
We have cleaned up the project a little or, if you started with a clean workspace, we now have a basic structure that we can start version control with. In the root directory of our project, we call git init. To make sure we don’t commit binaries or other files, that shouldn’t be part of the repository, we create the file .gitignore, which tells git which files to ignore. I propose to start with this file:
*.com
*.class
*.dll
*.exe
*.a
*.o
*.so
*.7z
*.dmg
*.gz
*.iso
*.jar
*.rar
*.tar
*.zip
*.cbp
*.log
*.sql
*.sqlite
 .DS_Store
.DS_Store?
._*
.Spotlight-V100
.Trashes
ehthumbs.db
Thumbs.db
*.vtk
*.eps
*.gpl
*.1
*.cmake
Makefile
CMakeFiles/
CMakeCache.txt
.cproject
.settings/
.idea/
build/
.vscode/
*.pc
.clangd/
This is a bit lengthy, but it contains a lot of types you don’t want to have in your VCS like binary outputs (.exe, .a, and .o) as well as IDE configurations. Now, we can create a GitHub repo. It will give you a clone URL which you can use to setup your local repository to use it.
git init
git add --all
git commit -m "Initiali commit."
git remote add origin YourURLHere
git push -u origin master
This adds all files to the initial version, that are not explicitely excluded in the .gitignore file. After the push-command, you should also see the files online in the GitHub interface. Next, we will start testing our code!
Gtest
The googletest framework is my goto framework when I test C++ Code. Again, a complete introduction would go way beyond the scope of a single article, but let’s create the file unit_tests/SomeTest.cpp and add a simple Test case:
#include "gtest/gtest.h"
#include "../src/someHeader.h"

TEST(SomeTestSuite, SomeTest) {
  MyType obj = new MyType();
  obj->set_the_value(5);
  ASSERT_EQ(obj->get_the_value(), 5);
}
In the first line, we reference Googletest so we can use its functionality. Next, we load some parts of our own code we want to test. The TEST macro declares a test case. Every test case belongs to a suite (SomeTestSuite) and has its own name (SomeTest). These values are not defined anywhere else, you only pass them to the TEST macro and it will use them. This creates a test case, so now, we only need to implement what that test actually is, which we do in the next 3 lines. We create an object out of some part of our library. We perform some action on it and then we use another Googletest macro: The ASSERT_EQ (speak “assert equals”) macro means, that the test will succeed if the first and second arguments have the same value. You can find a complete list of assertions here.
As mentioned above, we want to put the entire googletest project into the third_party folder. A first way to do this is to simply copy the files in there. That way, you would create multiple issues for yourself:
- The size of your repo would grow a lot because googletest is large.
- You would have to manually update the code if new versions of googletest are released.
As an alternative, we can use the git submodule functionality. This way you can integrate another repository as a child in yours and git will then be able to fetch updates for it and exclude the files from your repository. In Web UIs like GitHub it will even link to the repository of the included project when you attempt to look into the folder. The commands you have to execute are simple:
cd third_party
git submodule add https://github.com/google/googletest.git
git submodule init
git submodule update
After entering the third_party directory, you add a git submodule by specifying its location. Essentially this will perform a git clone of the repository and mark the main folder as a submodule. Next you tell git to initialize it as a git submodule and to update its config. These steps only have to be performed once. To update the version of googletest later on, simpliy perform git submodule update –remote. You will now see this in your GitHub account (after your next commit and push):
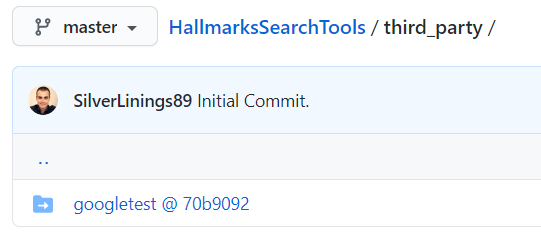
One important remark: If you ever want to clone your repo, simply add –recurse-submodules to the clone command. This will tell git to also clone the googletest submodule. Next, we will update CMake to do two things:
- Compile our test cases: We have written test cases that use the googletest macros. We want to compile these tests to be able to execute them. We will have to link the test-executable against googletest to have its functionality available. Since we have only included the source code of the googletest project, we also need to
- Compile googletest. We have included googletest into our project directly by putting the entire project into the folder third_party/googletest. It is not enough to simply say we need it as a dependency, we also have to build it. There is also the option of installing googletest system-wide and to run cmakes automatic detection. This approach works in most cases but requires all your project to use the same version of googletest, which, in turn, is the version in the package repository of your OS and could be old.
We append the following lines to the file we had before:
set (gtest_force_shared_crt ON CACHE BOOL "MSVC defaults to shared CRT" FORCE)
add_subdirectory(third_party/googletest)
target_compile_definitions(gtest
  PUBLIC
    GTEST_LANG_CXX20
    GTEST_HAS_TR1_TUPLE=0
)
add_executable(tests)
target_sources(tests
  PRIVATE
    unit_tests/SomeTests.cpp
)
set_target_properties(tests PROPERTIES COMPILE_FLAGS "${cxx_strict}")
target_link_libraries(tests gtest gtest_main Core)
The first line should simply be copied. It alleviates some issues on Windows systems about compile-option incompatibility. This forces a default behavior for the googletest to be compatible with the defaults on your own project. Next, we add the subdirectory containing googletest to our project. Since this folder contains a CMakeLists.txt, it will run CMake on that project and thereby set it up for us. The CMakeLists.txt in googletest defines a target named googletest which we now configure to suit our needs: We specify that it should be PUBLIC, which means that we will be able to use it and link our test-binary against it. We also specify that googletest should use the latest C++ standard (GTEST_LANG_CXX20 is C++ 2020). GTEST_HAS_TR_TUPLE=0 disables support for some STL Tuple classes which throw errors in some Windows environments so just copy this command. Add_executable declares our tests-binary. Executing this binary will run the test for us. So far it is an empty shell without any source-files compiled into it. In the next line, we state that the target tests should be built from the file unit_tests/SomeTests.cpp file, which we created earlier.
The second line from the bottom is only required to set some required properties for compatibility with googletest and the last line declares, that the binary containing our tests should be linked against googletest as well as our own library, Core. After calling make on our project now, we can run our test by executing ./tests, or in more detail: Navigate to the build folder by calling cd build. Call cmake .. followed by make. Now you will see a bunch of files in this folder:
- Main: This is the binary, that executes your code normally, i.e. starting in your int main() in the main.cpp.
- tests: This binary executes your googletests for you and writes the output. As a remark: This binary contains way more functionality than just the test cases you wrote. For example, you can call ./tests –help to get some help on how to use it, you can specify to only run certain test and you can pass the argument –gtest_output=XML to tell googletest to write a test output file that a CI system can read. Running ./tests should give you output something like this:
[==========] Running 4 tests from 2 test suites.
[----------] Global test environment set-up.
[----------] 3 tests from PaperTests
[ RUN      ] PaperTests.OccuringWordsBase
[       OK ] PaperTests.OccuringWordsBase (0 ms)
[ RUN      ] PaperTests.IllegalChar
[       OK ] PaperTests.IllegalChar (0 ms)
[ RUN      ] PaperTests.OccuringWordsExtended
[       OK ] PaperTests.OccuringWordsExtended (0 ms)
[----------] 3 tests from PaperTests (1 ms total)
[----------] 1 test from HistogramTests
[ RUN      ] HistogramTests.BasicHistogramTests
[       OK ] HistogramTests.BasicHistogramTests (0 ms)
[----------] 1 test from HistogramTests (0 ms total)
[----------] Global test environment tear-down
[==========] 4 tests from 2 test suites ran. (1 ms total)
[  PASSED  ] 4 tests.
What we did so far
As a short overview of what we have done so far, we have first created a basic C++ project. Next, we have added some structure by building a folder structure and configured CMake for that project. This enabled us to compile the project without calling our compiler ourselves. Then we introduced googletest to be able to write tests for our code. We included googletest into the project, specified how to build it, and defined a test binary that performs the tests. We have a setup that separates our main build, which creates the production binary, the program we want to create, and the tests we write to make sure it works.
The project is managed by git and contains googletst as a submodule. We have a backup on GitHub and we have specified ways to run both the main function as well as our test cases.
In the next steps we will add CircleCi to run our tests for us whenever we push something to GitHub. This will provide us with a much more modern work environment because we will now be able to develop on platforms, on which we can’t even build or run the tests. The tests have the advantage, that we no longer have to run our entire project to check if small features work. With CI enabled, we don’t even have to be able to run tests locally – we can commit the changes to the repo and see online if the tests worked or not.
If we no longer run the tests locally, we need to specify where to run them instead. To this end, we use docker. Docker provides operating system images in so called containers. We will create a container image that contains all the functionality we require for our project and setup CircleCi to use that container to run our tests. Then, it will retrieve the test results and make them available in the web interface and as a badge, shown in our GitHub repository page.
CircleCi provides blueprints for setting up projects in various languages – C++ sadly isn’t among them at the moment. Since we will need a container to enable CircleCi to run our code, we will start by creating the Docker container and then set it up in CircleCi.
Docker
Docker has become an enourmous ecosystem of complex functionality, the core of which is the management of operating system images. The default way to create such an image is called a Dockerfile. This is the one we will be using:
FROM ubuntu:focal

LABEL maintainer="Pascal Kraft" \
      description="Basic C++ stuff for CircleCi repo." \
      version="0.1.0"

ARG DEBIAN_FRONTEND=noninteractive
ENV TZ=Europe/Berlin
RUN apt-get update -y && \
    apt-get install -y tzdata

RUN apt-get install -y --no-install-recommends\
                    git \
                    curl \
                    gcc-9 \
                    g++ \
                    clang-10 \
                    build-essential \
                    cmake \
                    unzip \
                    tar \
                    ca-certificates && \
    apt-get autoclean && \
    apt-get autoremove && \
    apt-get clean && \
    rm -rf /var/lib/apt/lists/*
The first line is crucial: This Dockerfile uses another as its base and then only configures the system. ubuntu:focal means, that we want to start with Ubuntu 20.04. Then we specify some metainformation about the Docker image we are creating, like its version, what it is for and who is maintaining it. The ARG and ENV lines set properties in the system. The first one says that all commands should run as if there was no input devices available, i.e. the script should run without our interference, so no programs should ask any questions on the console. We will be depending on the package tzdata, which contains information about timezones. Its default behavior is to ask were the computer is located during installation. To circumvent this, we provide the variable TZ as part of the environment (EV) which tzdata will use instead of asking.
After this initial setup we can run simple command line commands with the Docker RUN syntax. In the first RUN block we load the package sources from the package sources so we can perform installs later. Then we install tzdata. I turned this into a seperate block because it frequently failed for me so I wanted to have that step performed first.
Next, we install all the basic dependencies of our project in the image. -y tells apt not to ask us about anything and simply install the packages. –no-install-recommends keeps the installed packages to a minimum and keeps our resulting image a bit smaller. This option can be removed. The packages we install contain git, obviously, GCC-9 and Clang, CMake, and some other useful utilities. Ca-certificates is installed because it enables us to store artifacts because otherwise, we will see errors about not being authorized to upload artifacts, which happens because https-connections cannot be established. Afterward, we remove all unnecessary data by performing apt-get autoremove, apt-get clean and apt-get autoclean as well as deleting the downloaded package-sources by calling rm -rf /var/lib/apt/lists/*. These steps simply reduce the size of our docker image, which reduces the time it takes to load the image.
Once our Dockerfile is ready we create a new GitHub repository only containing this single file. You can call it DockerfileRepositoryForCpp. It should only contain the Dockerfile which has to be named Dockerfile (no file ending). Then move on to DockerHub. If you don’t have one already, create an account, and verify your email address. I would recommend signing up with your GitHub account. Once you are logged in, select Repositories at the top and click Create Repository on the top right corner. Provide a name and description, make it public and scroll to the bottom. You should see a section Build settings and a Github icon in it. Click it and connect your GitHub account to your Docker account. After the accounts are connected, you should see the word connected in green underneath the Github icon on the Create repository page. Clicking the GitHub icon now should open two input-fields: One for an organization, where you select your Github Account, and one for a repository, where you select your DockerfileRepositoryForCpp repository. Next, click Create & Build.
The process will take a while to complete, because now, Docker will download the base-image we specified in line one, perform the configurations we noted in the Dockerfile and then make an image of the resulting operating system available. There are other ways to set up a Docker image, for example, you can use Docker CLI tools on your local machine and perform a docker build locally. After that, you can then push your finished image to the repository. This has the downside of requiring a complete upload of the image from your machine to Docker, which, if your internet connection is asymmetric (which it usually is) can take very long. The way I described above has the advantage, that GitHub and Docker servers only exchange the Dockerfile and everything else happens on the Docker servers, so no upload is required. It also introduces version management to your Dockerfile which can come in handy at some point.
CircleCi
We now have the code base finished and available in GitHub, we have our tests, we have configured CMake and we have a Docker image to run all of those steps on. All we need now is a pipeline setup for CircleCi to make it perform the necessary steps.
As a first step, we log into CircleCi using our GitHub account. Next, we add a project and select the project containing our code and tests on GitHub. Currently, CircleCi has no template for C++ projects, so you can pick the HelloWorld blueprint which CircleCi will suggest to you. Click Add Config. CircleCi will create the project and also add a new branch to your repository named circleci-project-setup. It contains one commit that has one new file .circleci/config.yml which contains the CI-pipeline setup. In the future, CircleCi will be informed about all commits against this repository and will always perform the steps listed in the config.yml file. So by changing this file you can change which steps CircleCi performs for you. I propose to use this config.yml:
version: 2.1
executors:
  exectr:
    docker:
      - image: YourGitHubName/YourDockerRepoName:latest

jobs:
  build:
    executor: exectr
    steps:
      - checkout
      - run:
          name: Setup gtest child repo
          command: |
            cd third_party
            git submodule init
            git submodule update
      - run:
          name: Setup cmake and build artifacts
          command: |
            mkdir build
            cd build
            cmake ..
            make
      - persist_to_workspace:
          root: .
          paths: build

  test:
    executor: exectr
    steps:
      - attach_workspace:
          at: .
      - run:
          name: Execute Tests
          command: |
            cd build
            ./tests --gtest_output=XML
      - store_test_results:
          path: build

workflows:
  version: 2
  build-and-test:
    jobs:
      - build
      - test:
          requires:
            - build
To explain this file we will start at the bottom: It declares a workflow. The workflow is called build-and-test and contains two jobs: build and test, of which test depends on build. Now, all we need to do is to declare what the steps build and test actually are.
In line 8 we begin defining our build job. It contains a list of steps to be performed. The checkout step will prepare our code (since CircleCi knows which repo it is supposed to use, we don’t need to specify the repository here). It doesn’t load the submodules however, so we manually do that right after checkout. The step syntax is pretty intuitive: every step consists of a name and a command to be executed in the shell. The pipe (|) at the beginning of a command block means, that there will be several commands that are supposed to be executed after each other. We enter the third-party folder and load the googletest repository as described above.
Next, we make a build directory, enter it, configure our codebase with cmake .. and start compiling with make. We could run our tests right away in this or a following command block, that would have one major downside though: There are two points of failure in our project: The codebase could no longer compile or a test could no longer work. If we split the CircleCi pipeline into two jobs, we have the advantage, that we will be able to see on the CircleCi dashboard which jobs worked and which didn’t, which will make diagnosing problems a lot faster.
Therefore, once the build has finished, we save the contents of the build directory to our workspace, so we can easily make them available in any other job. In the test-job we first load that workspace and are now on the same state again that we were on at the end of the build-job. We run only one block of commands, which enters the build directory and runs ./tests –gtest_output=XML. In addition to the test results on the console, googletest will now also generate an XML file containing all tests that ran and their result. CircleCi can scrape folders for such results if we add a step add_test_results with the path of a folder containing such XML files.
In both our jobs, we specified an executor. That is a shorthand for a system to run the pipeline on. We define this executor at the very beginning of the config-file. We define an executor called exectr which uses the Dockerimage we created earlier. To find out the URL you should put here, go to your repositories list in DockerHub. You will see something like

Here, silverlinings89/cpp_build_environment would be what you are looking for. To specify which state of that repository should be used, append :latest to that name. So in my case, I would write – image: silverlinings89/cpp_build_environment:latest
After adapting this file to your project, commit it to your repository and push the commit to GitHub. The CircleCi pipeline should start your pipeline right aways, build your project, perform the tests and show you the state of each job. You should see something like this:
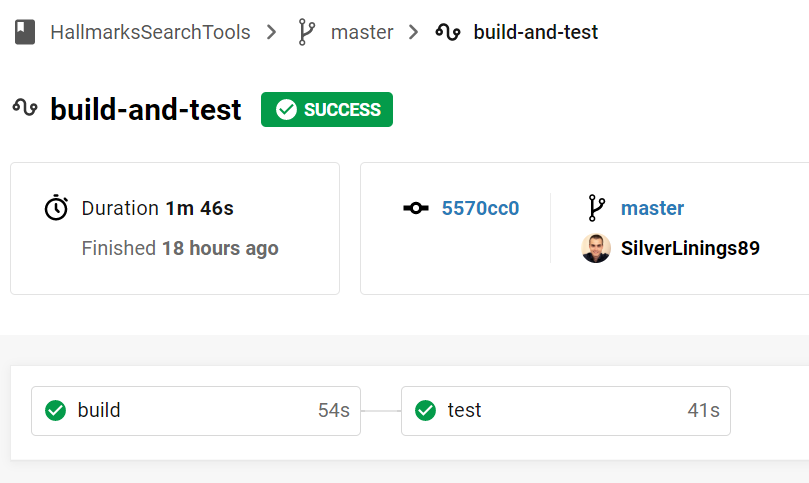
As you can see, both jobs are gree, i.e. have worked and therefore, the build is a success. You can click on the test job to see more details:
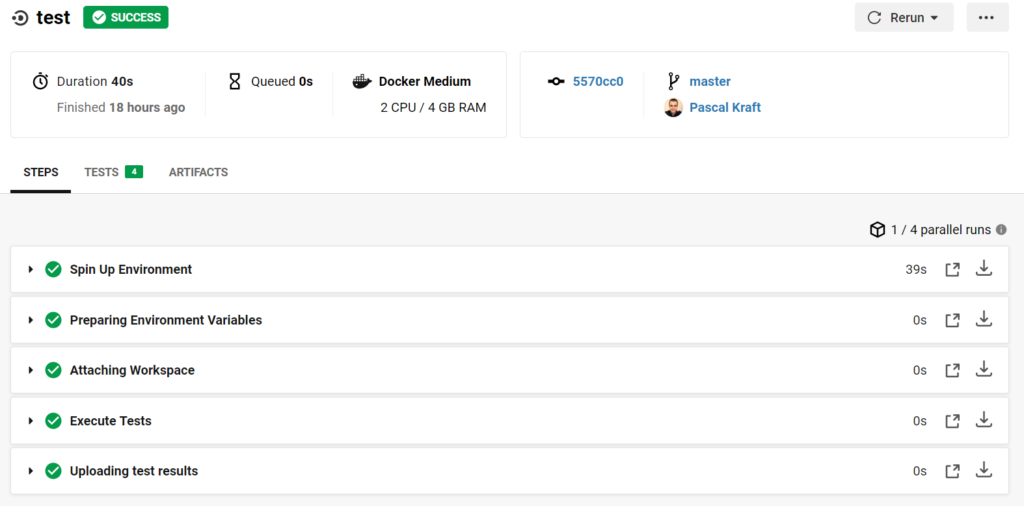
This view lists the individual steps and you can see in the middle that there is a tab TESTS [4], which lists the parsed test-results from the file we have uploaded. If you click on TESTS, you see

In this setup, I have 4 tests and they are all green. Test result visualization is suboptimal and there are steps you can take to increase the readability of you test results but for now, this basic setup should suffice to get your project going. This pipeline will run whenever you push commits to GitHub and will show you results of the pipeline for the current state of every branch of your repository in your CircleCi dashboard. There is one more nice piece of eyecandy you can use to integrate the state of the repository (if the build passes or not) in GitHub and make it quickly accessible:
README.md
It is always a nice step to add a Readme.md to your repository because GitHub visualizes it nicely and it gives people working with a code a place to start. If you are unfamiliar with the syntax, there is a nice cheat sheet on GitHub. On this page you will find an introduction to creating badges for your Readme.md that visualize the status of your pipeline. It will either show a green passed-badge or a red failed-badge. The code for it is
[](<LINK>)
In my project that was
[](https://app.circleci.com/pipelines/github/SilverLinings89)
Closing remarks
Grab another coffee, you made it the whole way through!
I hope this was instructive for you and that I could help you get some structure and automation into your project. I tried to explain why the steps were necessary along the way. If you found this article useful, share it with other people that might find it interesting and leave me a comment if there are any questions.